목차
Introduction
보통의 Anomaly Detection 논문들은 Auto Encoder를 이용하여 Reconstruction Error를 이용한 방법을 사용한다. Anomaly Detection의 가정으로 가지고 있는 데이터가 전부 정상이거나 일부분만 비정상이다. 또한 이 비정상의 데이터가 어떤 것인지 모른다는 가정이 있다. 일부 논문들에서는 비정상(abnomaly)의 데이터를 가지고 있다는 전제 조건하에 supervised 혹은 semi-supervised 방법을 제시하지만 기본적으로 unsupervised인 Auto Encoder를 이용한 방법이 여전히 많이 사용되고 있긴하다. 데이터의 분포의 가정을 이용하여 학습 시 대부분 정상의 패턴을 학습하게 된다는 것을 이용한다. 이 논문에서는 이 부분에서 발생하는 문제점을 정의하고 있다.
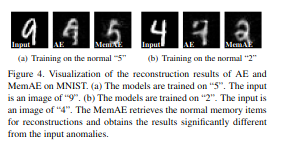
Autoencoder를 이용한 논문은 정상 데이터를 대부분 학습하여 비정상 데이터를 입력하여 정상으로 재구성된다고 얘기한다. 그래서 입력과 출력의 차이를 이용하여 비정상 데이터를 구분한다. 하지만 auto encoder는 너무 잘 일반화가 된다면 비정상이 입려되어도 비정상 데이터를 잘 재구성하여 출력이 정상이 아닌 입력된 비정상에 가까워 질 수 있다고 얘기한다. 아래 그림은 그 예시로 MNIST 데이터에서 5를 정상으로 하여 학습을 진행하였지만 9를 입력하였을 때 5가 아닌 비정상 입력인 9에 가깝게 재구성되는 것을 확인할 수 있다.
 Motivation
이 문제를 해결하기 위해서 논문에서는 latent vector를 그대로 사용하는 것이 아닌 메모리를 두어 메모리에 있는 latent vector와 현재 latent vector를 비교하여 가장 비슷한 latent vector 메모리에서 꺼내와서 사용하자는 것이다. 그렇게된다면 latent vector는 정상의 정보를 담고 있을 것이므로 재구성되는 이미지 또한 정상일 것이다라고 주장한다.
Memory-augmented Autoencoder
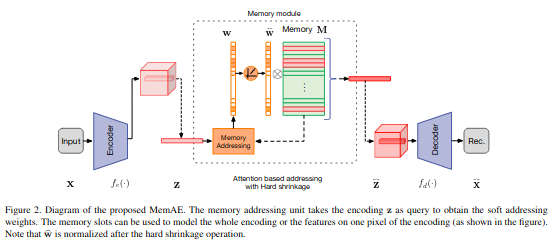
아래 그림은 Memory-agumented Autoencoder(MemAE)의 구조이다. 일반적인 Autoencoder와 비슷하지만 latent vector를 그대로 decoder에 넘기는 것이 아닌 memory module을 통과하여 생성된 latent vector를 사용하는 것이 다르다.
 Memory-augmented Autoencoder
Memory module
Memory-based Representation
몇가지 notation을 정의한다.
- M: memory \(M \in \mathbb{R}^{N\times C}\)
- N: memory size
- C: latent vector size(representation dimension)
- z, \(\mathbb{Z}\): latent vector from encoder \(\mathbb{Z}= \mathbb{R}^C\)
- \(\hat{z}\): latent vector from memory module
- w: soft addressing vector \(\text{w} \in \mathbb{R}^{1 \times N}\)
해당 논문에서 \(\hat{z}\)의 공식은 아래와 같다.
\[\hat{z} = \text{w}M = \sum^N_{i=1} w_i m_i\]Attention for Memory Addressing
w는 attention score라고 할 수 있다. 식은 아래와 같다.
\[w_i = \frac{\text{exp}(d(z,m_i))}{\sum^N_{j=1}\text{exp}(d(z,m_j))}\]여기서 $d(\cdot,\cdot)$$은 유사도를 나타내고 이 논문에서는 cosine similarity를 사용한다.
\[d(z,m_i) = \frac{zm_i^\text{T}}{\vert \vert z \vert \vert \vert \vert m_i \vert \vert}\]메모리 사이즈가 제한적이기 때문에 다음 섹션에서 소개될 sparse addressing technique을 사용한다.
Hard Shrinkage for Sparse Addressing
제한된 메모리에 있는 정상 패턴은 비정상 데이터에 대해 재구성 에러를 높게만드는 데 도움이 된다고 한다. 그렇지만 여전히 몇몇 비정상 데이터는 메모리에 있는 정보를 조합하여 재구성이 잘될 수 있다. 그래서 복잡하게 정보를 재조합하여 사용하지 못하도록 w에 hard shrinkage operation을 추가하여 w를 sparse하게 만든다.
\[\hat{w}_i = h(w_i; \lambda) = \begin{cases} w_i, &\text{if}\: w_i >\lambda \\ 0, &\text{otherwise} \end{cases}\]w는 non-negative여야하기 때문에 continuous ReLU activation function을 사용하였다.
\[\hat{w_i} = \frac{\text{max}(w_i - \lambda, 0) \cdot w_i}{\vert w_i - \lambda \vert + \epsilon}\]Shrinkage 이후 \(\hat{w}\)를 renormalize한다.
\[\hat{w_i} = \hat{w_i} / || \hat{w} ||_1\]이렇게 만든 Shrinkage \(\hat{w}\)를 이용하여 새롭게 latent vector를 만든다.
\[\hat{z} = \hat{w}M\]Training
기본적으로 AutoEncoder와 동일하게 reconstruction error를 loss로 사용한다.
\[R(x^t, \hat{x}^t) = || x^t - \hat{x}^t ||^2_2\]또한 sparse한 w를 위해서 entropy loss를 사용한다.(entropy loss를 최소화하면 오히려 uniform distribution에서 멀어질 텐데 왜 이렇게 한지 모르겠다.)
\[E(\hat{w}^t) = \sum^T_{i=1} - \hat{w_i} \cdot \operatorname{log}(\hat{w_i})\]최종 loss는 아래와 같다.
\[L(\theta_e, \theta_d, M) = \frac{1}{T} \sum^T_{t=1} (R(x^t, \hat{x}^t) + \alpha E(\hat{w}^t))\]Experiment
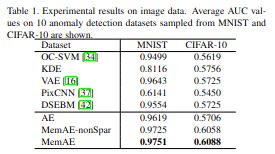
MNIST와 Cifar-10에서 결과를 확인하면 가장 좋은 결과를 보여주는 것을 확인할 수 있다.
 Experiment 1
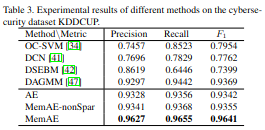
다른 데이터셋에서 비교를 하면 Sparsity가 의미가 있는 것을 확인할 수 있다.
 Experiment 2
 Experiment 3
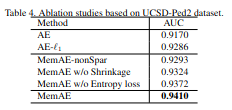
Ablation study를 확인하면 각각의 제안 방법들의 영향을 알 수 있다. nonSparsity를 사용하는 것보다 shrinkage나 entropy loss를 사용하는 것은 각각 더 좋은 결과를 보여주고 둘이 같이 사용하는 것이 가장 좋은 결과를 보여주는 것을 확인할 수 있다.
 Experiment 4
